 |
|
||||
|
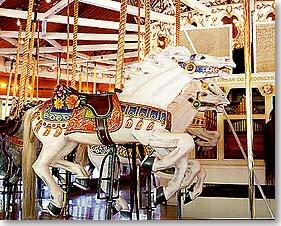
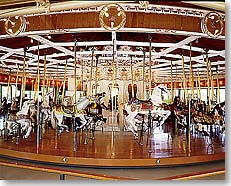
When you restore and maintain a Looff Carousel, the creator of the Coney Island Style of Carousels, you soon learn how to paint gold. Lot's of gold, and silver, and brass. Every horse created in this flamboyant style has jewels up the gazoo and gold braid, gold tassels, gold cherubs, gold edging, gold, gold, gold. By the time I had painted 54 horses, one tiger, one giraffe, and two dragon chairs I had pretty much figured out some do's and don'ts. I had also come up with some pretty unusual effects and applications when working with metallic paints.
The Spokane Looff also receives an aggressive ridership due to the ring arm. The act of the grabbing for the gold ring would wear off a large amount of the gold on the animals. If I were doing the same carousel figure for a private restoration or doing a new carving, I would do it in gold leaf in certain areas only. It is difficult to place it around carved edges. It is difficult to place it on manes and tails that were not designed to be gold leafed. It is difficult...but not impossible. The other factors are cost and convenience. Gold leafing can be intimidating. It doesn't have to be with today's materials. In the past, the glue sizing had to be painted on the surface and allowed to cure out for 24 hours. If it was too wet, the thin sheets of gold would drown or actually sink into the sizing. If it was too dry, the gold would not adhere to the surface and you would have to start over or attempt to rewet the surface with alcohol. All the chemicals were pretty smelly. There was also the expense. A book of gold, or approximately 25 sheets, 5"X5", is priced approximately at $50.00. Then there were all the other materials needed. This is expensive for a beginner or for a single, one time project.
The composition leaf is slightly thinner than it's historical counterpart but it is an inexpensive way of learning the technique and the finished product is very difficult to distinguish from the real thing. You can practice your skills on many household items until you get the feel for it. You simply paint this adhesive-size onto the surface and wait approximately one hour. It goes on a milky color and turns clear as it dries. You can paint the surface a base coat of drab olive green (for brass), brick red or dark rust-brown. Make sure the surface is as smooth as possible. To test the sizing, rub the back of you knuckle across the surface. You should feel a drag and perhaps a squeak which tells you that the surface is ready for the leaf application. A few tricks. Using an ordinary clip board, clip your book of gold sheets to the board. The leafs are separated by a thin tissue paper. Flip the tissue back and if necessary score the sheet with your finger nail to cut it into manageable size pieces. Work down through your book instead of using one sheet up and going on to the next. This will not damage the lower sheets as you score it. Always work with strips bigger than your area if doing borders or an area that you need to wrap it around an edge. Sometimes you must lay it on like a mosaic and wrap around the edges. Using a wide, flat sable brush, rub the brush across the top of your hand or even cheek. This produces static electricity. Then lay this brush flat on to the gold piece. The gold will jump right onto the brush. Then carefully transfer this piece to the surface and lay in on to the adhesive-size. Brush across it LIGHTLY to adhere it to the surface. Repeat the process until the area is covered. If you have gaps, small pieces can be placed with overlaps. Once the surface area is covered, brush back and forth with your soft brush to removed the overlapped pieces and the flakes that have not adhered. You can then paint around the edges of your treatment to tighten up the lines and lock the edges. A sign painter will quite often outline the letters of design with a contrasting color to bind the edges and give it a more finished appearance. You can rub a pattern into the surface using a cotton ball or even a small piece of velvet. This is called burnishing. A circular pattern is a nice touch. Be careful to do this softly as to not damage the gold. A glaze or tint can also be rubbed onto the surface. A clear finish is recommended as a 1. protective seal 2. to prevent tarnishing and 3. to provide a barrier from fingerprints and body oils or other contaminants. Be sure the surface area adjacent to the gold project is completely dry and or covered during the gold leafing project. The gold flakes will inbed themselves into uncured paint and have to be removed. Air currents and even exhaling while you are transporting the pieces of gold to the surface will cause them to "fly away". You can purchase brushes specifically designed for the laying on of the gold and brushing it down, but they are not necessary for a single project. Any left-over sheets of gold can be stored in an air-tight plastic bag or container designed to hold sandwiches. If a bag is used, include a cardboard sleeve to protect the sheets from breaking. If you are going to do a large project, such as an Illions style mane and tail, I suggest the real gold leaf. It is much easier to handle in larger pieces. You will soon learn why Illions carved these upward flaming manes so very flat. For smaller accents or the "jewelry" on a carousel figure, the composition leaf will work just fine. It is a classy addition to your carousel animal and a little of the effect goes a long way. A combination of the two, gold leaf and gold paint, is also possible. The next column will explore some of the faux finishes and fun treatments that can be achieved with the metallic paints. Other books on this subject are:
If you have any questions, please e-mail me by clicking Here.
Click here to display our site map
|
|||||||||||||