|
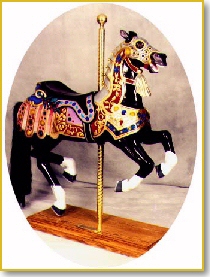
Reproduction of 1909 Looff figure
Carved by Chuck Kaparich
|
The early
carousel animals were often decked out with gold paint. It is used as an
accessory just as one would wear jewelry. Often the same principals apply.
Gold with warm colors, silver or brass with cool colors. The early painters
used gold powder combined with a medium. This medium acted as a binder to hold
the powders together, a vehicle to apply the paint and a dryer which enables
the whole combination to dry. This was then sealed with shellac, lacquer or
varnish. The shellac method usually involved a tinting with orange pigment to
further enhance the gold effect.
Today we have much of the same options. The powders are available which can
be mixed with any pre-made oil paint mediums. They can be mixed with acrylic
mediums or can be topped off with the tinted shellac as well.
 The key thing
to remember is that none of the paints contain anything that will make the
gold durable. If you are going to apply it to a high wear area you must top it
off with a durable clear coat of some type. This is also necessary for real
gold leaf as well. Both paint and the real Gold Leaf will tarnish. The clear
coat will slow down this process. The key thing
to remember is that none of the paints contain anything that will make the
gold durable. If you are going to apply it to a high wear area you must top it
off with a durable clear coat of some type. This is also necessary for real
gold leaf as well. Both paint and the real Gold Leaf will tarnish. The clear
coat will slow down this process.
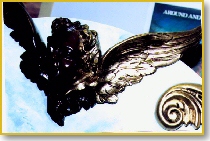 Picture 1 shows
a carousel figure that has been done with Gold Leaf, gold paint and silver
paint. It would be difficult to tell which areas are which unless a very close
inspection is done. This is a reproduction of the actual Looff horse that
rides on the Spokane Carrousel. The real "Prince" is done entirely in gold and
silver paint. Picture 1 shows
a carousel figure that has been done with Gold Leaf, gold paint and silver
paint. It would be difficult to tell which areas are which unless a very close
inspection is done. This is a reproduction of the actual Looff horse that
rides on the Spokane Carrousel. The real "Prince" is done entirely in gold and
silver paint.
Rather than deal with powders, you can purchase metallic paints that are
premixed. Avoid those that contain Thulene as they are very toxic. Their
colors are very bright but are not worth the hazard. There is acrylic based
gold, (somewhat dull) Odds and Ends (linseed oil based) Midget ( plastic
based) and One Shot (may contain lead) and Krylon brands.

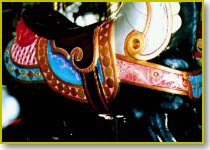
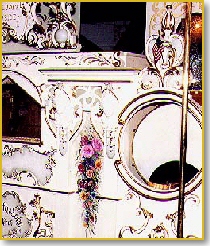
Limited Edition Rocking Horse
By Bob Cherot
|
The Midget brand
is difficult to touch-up but can be used on non-wear areas. Their colors are
confusing to me. The brass looks like gold, the gold looks like brass. The
clear coat must be the "new" polyurethane (water clean-up ) or it will attack
the plastic base. The powders are not very durable and must be consistently
mixed for continuity. The Odds and Ends brand are bright, have a consistent
color, and can be touched-up. They are compatible with all types of clear
coats. The One Shot is easier to use for pinstriping on small detail, flow on
in a consistent layer for larger areas but are somewhat dark and dull in the
gold range. All the brands are available in brass, gold, chrome, silver and
copper. There are several other brands available but the ones mentioned are
readily found, are reasonably priced and come in a 1/4 pint bottle.
I do not use the antique gold in any brand as the paint will tarnish with
age to this shade and the paint seems to be "hotter" and will curdle any
undercoat that has not cured out for several days. This makes it more
difficult to work with. The copper shades also age more quickly so I avoid
these as well.
 The main trick
in applying gold paint in the undercolor or prime coat. It must be flat,
meaning when dry it has no luster. It should be a color. A dull Army green
under brass or a light gold, a rusty brick red under a warm gold, a dark
black-brown under a antique gold effect. You can mix this undercolor by using
a flat paint such as flat black with red oil pigments or red enamel. The green
is done by mixing either white primer or flat white with green and orange. Be
sure this base color is completely dry before applying the gold. This means at
least 24 hours for oil based paints. The main trick
in applying gold paint in the undercolor or prime coat. It must be flat,
meaning when dry it has no luster. It should be a color. A dull Army green
under brass or a light gold, a rusty brick red under a warm gold, a dark
black-brown under a antique gold effect. You can mix this undercolor by using
a flat paint such as flat black with red oil pigments or red enamel. The green
is done by mixing either white primer or flat white with green and orange. Be
sure this base color is completely dry before applying the gold. This means at
least 24 hours for oil based paints.
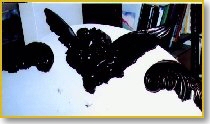
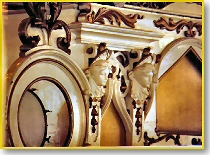
Pictures 2 and 3 shows an angel that is primed with chocolate brown, then
dry brushed with dark rust brown. The gold is then applied by brushing across
the carving in order for the brown to show through. This gives a rich antique
gold effect.
When applying on a smooth surface the next important factor is the brush
strokes. Apply the paint by placing it on a VERY smooth surface with strokes
going in the same direction. DO NOT go back and forth. As the medium is a
"hot" mix do not go back and touch up as you paint as it may curdle the paint
you have already applied. Wait at least a day with oil based or until complete
dry with acrylic based to do any touch up. If you apply a second coat it will
take care of any touch-up and add more depth and finish to your project.
 Picture 4 shows
gold stitching, a gold stencil with shadows to look like brocade and gold
tassels tinted with tube oil paint as it is applied. There is also a smooth
gold application on the bit and jewel circle. The fun of painting with the
metallic paints is in the different effects that can be achieved. You can: Mix
the tube oils and enamels to get tinted golds and silvers. (This will slow
down their drying time) Swirl it into wet paint for a marble effect or
splatter the gold dust on wet paint for a lapaluzzi look. Stencil with it and
then outline it for depth. One coat is subtle, two coats is outstanding. Dip a
comb or fork in the paint and drag it across a wet or dry painted surface. Dry
brush it on a carved surface that is based coated any darker color. Mix the
chrome or silver paint with white enamel and another color for a pearlescent
look as in Picture 5. The band organ in Picture 6 shows the aged, tarnish
gold. The same band organ in Picture 7 after restoration with a stenciled
surround in the background. Picture 4 shows
gold stitching, a gold stencil with shadows to look like brocade and gold
tassels tinted with tube oil paint as it is applied. There is also a smooth
gold application on the bit and jewel circle. The fun of painting with the
metallic paints is in the different effects that can be achieved. You can: Mix
the tube oils and enamels to get tinted golds and silvers. (This will slow
down their drying time) Swirl it into wet paint for a marble effect or
splatter the gold dust on wet paint for a lapaluzzi look. Stencil with it and
then outline it for depth. One coat is subtle, two coats is outstanding. Dip a
comb or fork in the paint and drag it across a wet or dry painted surface. Dry
brush it on a carved surface that is based coated any darker color. Mix the
chrome or silver paint with white enamel and another color for a pearlescent
look as in Picture 5. The band organ in Picture 6 shows the aged, tarnish
gold. The same band organ in Picture 7 after restoration with a stenciled
surround in the background.
 Clean up: With
most premixed golds, other than One Shot, there is such an active dryer in the
paint that it will dry on your brush while sitting in paint thinner. Pre-clean
your brush by rubbing in oil painting medium, or linseed oil, or lacquer
thinner, or even Neets Foot Oil. Then wipe the brush and proceed to clean with
regular paint thinner. Do not use your cleaning thinner for cleaning any of
your other paint brushes unless they are then cleaned with soap and dried
before reusing. The "hot" mixture left in the brushes and thinner may effect
your other paint applications otherwise. Clean up: With
most premixed golds, other than One Shot, there is such an active dryer in the
paint that it will dry on your brush while sitting in paint thinner. Pre-clean
your brush by rubbing in oil painting medium, or linseed oil, or lacquer
thinner, or even Neets Foot Oil. Then wipe the brush and proceed to clean with
regular paint thinner. Do not use your cleaning thinner for cleaning any of
your other paint brushes unless they are then cleaned with soap and dried
before reusing. The "hot" mixture left in the brushes and thinner may effect
your other paint applications otherwise.
Good luck with your gold project and if you have any questions be sure to
e-mail by clicking
Here.
PHOTO CREDITS
Photo: 1 Reproduction carving by Chuck
Kaparich.
Photo: 2,3 Rounding boards for "The DreamMaker" carousel by
Montana Carousel Company
Photo 4: Limited Edition Rocking Horse by Bob
Cherot
Photo 5, 6: Spokane Looff Carousel and Ruth Band Organ
Odds and Ends, manufactured by Plasti-kote of Medina, Ohio,
44256
|
Bette Largent is a professional carousel horse restoration artist from
Washington State, and the author of
Paint The Ponies,
a guide for those who are interested in learning the art of painting
carousel figures.
Click
Here
for information on ordering her book.
|
|