 |
|
||||
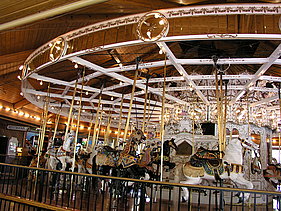
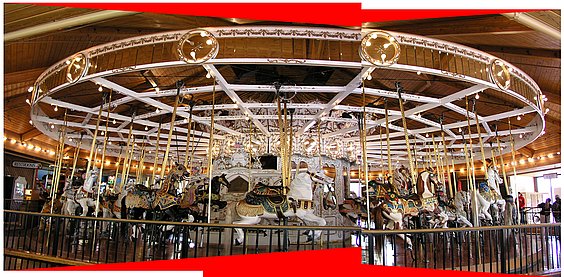
Carousel Photography - Creating a PanoramaWhen taking pictures of a carousel, it's often difficult to fit the entire carousel into a single shot. For most of us with consumer-grade digital cameras, there are no wide angle lenses available to help us out. However, it is possible for someone with a bit of knowledge of photo editing software to take two overlapping pictures of a carousel and build them back into an image of the complete machine. As with most other carousels, the walls of the Spokane carousel building are too close to the carousel to allow the entire machine to be captured in one frame. And even on the warm summer days when the outside doors are open, the doorways aren't wide enough and the ceiling isn't high enough for a single full-carousel shot. There are photo stitching programs available as well as software that often comes with digital cameras that are designed to re-assemble multiple shots into a panorama. My experience with these programs is that they usually aren't accurate enough to produce a good finished photo. So, one nice summer day I took my camera and a tripod to our carousel and took a number of shots from the same location. I tried taking left-half and right-half shots of the carousel, as well as overlapping pictures of the left, middle and right sections of the carousel. When I got home and started processing these pictures, I found that the two-shot sequences were sufficient, and that trying to use the third shot just added more work to the process. Here are a couple of shots of the carousel that I'll be using in this demonstration. (If you remember the 3D cross-your-eyes pictures from the 90s, you may be able to do that with these two images to see a 3D picture of our carousel!)
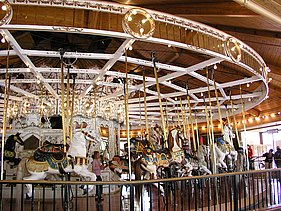
I started with a new blank image big enough to hold two of my pictures side by side, and copied the left and right pictures into the new image. Obviously, this wasn't a very satisfactory method, as the differing perspectives of the two pictures caused some very obvious alignment problems.
 The perspective of the left and right images isn't correct The next step was to apply a perspective filter to the pictures. This is used to reduce the size of one edge of each picture. I squeezed the right side of the left picture, and the left side of the right picture, and experimented around until I had as good of a match as I could achieve. (The area vacated by the squeezed section of the picture is shown in red.) Again, the two pictures were copied into a new, blank picture. Each picture was pasted into the blank image as a new layer.
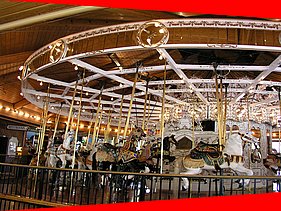
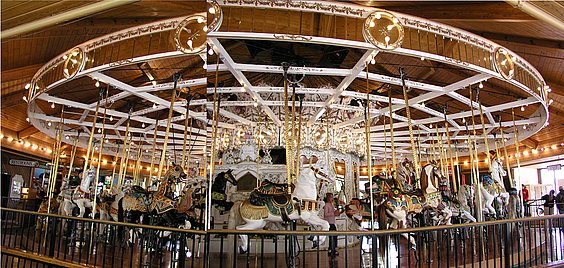
This new image is starting to look like a carousel with the correct proportions. I chose to use more of the left-hand picture than the right-hand picture, as it had a better view of the top of the carousel. The picture below is a detail of the seam in the combined images. It shows that the right-hand image is taller than the left-hand image. The middle is aligned (green arrow), but the top and bottom are misaligned.
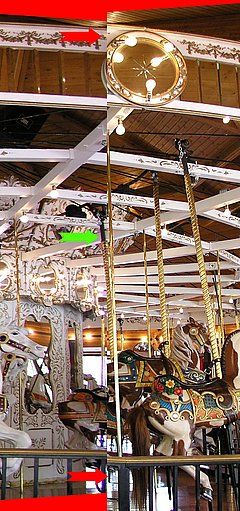 A closeup of the first seam After resizing the right-hand image to 97% of its original size, the two images are quite close to being equal at the point where they join (green arrows). At this point in the process it may be necessary to rotate one or both of the halves to get good alignment in the straight lines of the picture. This particular set of pictures was taken from a tripod which wasn't moved between frames and didn't need any rotation.
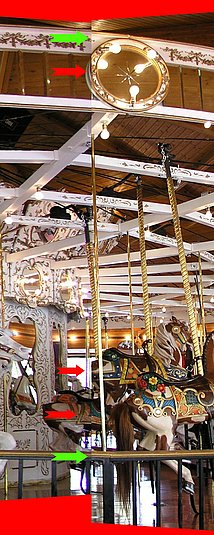 The seam after resizing the right-hand image The arrows in the picture above indicate that the two halves are quite close to alignment (green arrows), but more perspective issues are still causing problems (red arrows). The left edge of the top mirror has been clipped, the hind section of one of the horses is missing, and part of another horse's blanket has an extra joint. This is where the layering comes into play. When these images were placed as two layers, the left-hand layer overlaps the right-hand layer. By carefully erasing parts of the left layer around these problem areas to let the right layer show through, these alignment problems just disappear!
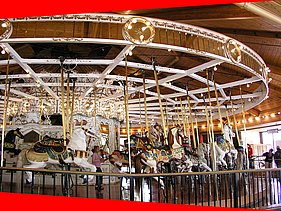
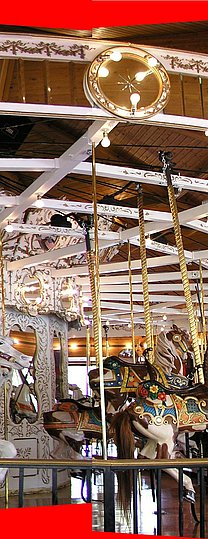
After increasing the brightness a little on the left-hand image to more closely match the right-hand image, the final picture was cropped and clarification and brightening filters were applied. It takes a pretty close look to locate the seam in this picture!
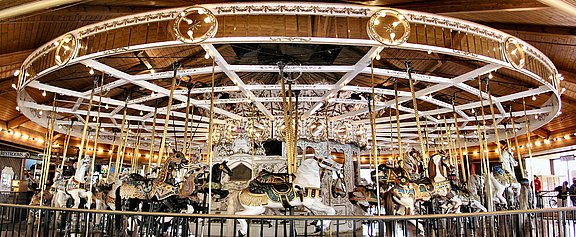 The Completed Panorama Click here to display our site map
|
||||||||||||