 |
|
||||
|
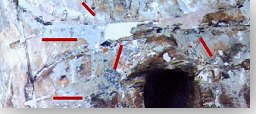
After careful stripping down to the prime coat we will sand off the remainder as it will better preserve the carving lines. In Rooster, the prime coat is white which tells us that it is a fairly recent application. The older lead based primers usually turn a honey or amber color. If you have questions about the type of primer that was used, a simple test kit is available at most paint stores.
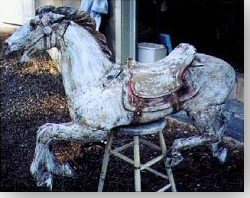
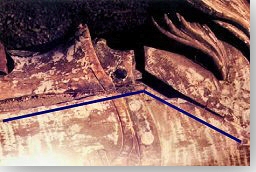
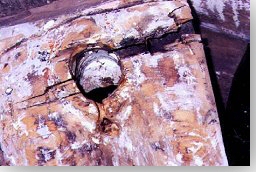
The neck and head had originally been nailed together. These nails had rotted through, the wood had shrunk, and the result was three large seams that were 1/4 of an inch apart. This had then been filled with Bondo. There wasn't a trace of glue in any of the areas. It was just a matter of time before the Bondo crumbled and the head would simply fall off the body. Some of the other heads on this machine had done exactly that. Just the process of removing all of the metal and filler resulted in a totally disassembled figure - literally a horse in a box. At this point, an evaluation had to be made to determine which parts could be salvaged. Part of this evaluation process takes into account the fact that this horse would go back on an operating machine with over 100,000 riders annually. It was an outside row horse which meant it would receive a higher number of riders. In a private restoration these factors would not have been as vital. It would also determine the type or strength of the glue we would use in certain areas.
This particular type of horse was made by a manufacturer that was well known for metal in original construction. They were also known for lap joints in the hip and knees. Although these joints were meant to be an efficient method of construction, they have proven not to be the best type for many years of operation. The squeezing of the legs in transporting and the bumping during operations have resulted in breaks and a wide variety of temporary solutions. Most of these quick fix solutions result in even more damage as the figure ages. We will replace them with a glue and doweled joint. Yes, the horse will still retain it's primary identity, such as head, mane, blanket, saddle and torso. Small dry rot spots in non-stress areas are not removed. They will be treated with ferring epoxy, a treatment for dry-rot developed for the boat industry. All the pieces and parts will be glued and doweled as the figure is reconstructed. For private restorations, the ferring epoxy can be used to save original carvings. It is not the answer for major carved components. Calipers and exact measurements of the original pieces enable us to carve exact replicas. The pieces are carved slightly larger where they join the old piece. Once glued in place we can sand and shape the new piece to match exactly without any seam showing. The reconstruction and wood restoration on Rooster was done by Bob Cherot of the Montana Carousel Company, Inc. When so much of a figure has to be recreated it is an asset to have a carousel carver available to do the restoration. You will run the risk of hearing how much easier it is to "carve a new one". There is, however, a great respect for the carving style of historical figure by today's carvers. Just as many artists learn by copying the old masters, carver's can and do learn from restoring a historic figure. They also learn not to make the same mistakes. To be continued........
Click here to display our site map
|
|||||||||||||||