 |
|
||||
|
Many carvers and restorers use the blind dowel system today. This is a combination of dowels and glue that are done on the inside. This prevents the dowels from expanding and contracting at different speeds than the wood, and working their way out of the structure. Again, the type of joint should be based upon the wear the figure will receive. If it is to be placed on an operating machine, the method and glue will be based upon the wear and tear on the joint and strength of the glue. If it is on a stair-step leg, perhaps a glued joint that will not destroy the carving when it does break will be chosen. The common wood glue, from Elmer's Glue-All Purpose which can be found in the grocery store to common ordinary Carpenter's glue, can be used for the lamination and dowel process. The Glue-All is water soluble so any use of it for bonding must be followed by sealant such as paint of clear finish. This glue as well as the Carpenter's Glue have no noticeable fumes and drips are easily cleaned up. The carpenter's glue (aliphatic resin) requires that the pourous surfaces must be clamped together for a minimum of 30 minutes and overnight is preferable. Another device such as a dowel may be used in combination with the glue to reinforce the joint. The advantage to this type of glue is price, spreadability, fumes, clean-up and strength. It is the glue of choice for lamination. It's life span on a joint is comparable to the original joint. It will break away clean when used in an area that will be prone to breakage due to design. It flows well for doweling. It does not permeate the total fiber of the wood. It does require that both surfaces be totally flat and the pieces must be held in place by some outside force such as clamps, pinch dogs, or other support until completely set. Dowels used should be rasped, roughed up or special spiral types in order to absorb the glue for strength. Today's dowels are TOO perfect. The original hand made ones were rough and not necessarily perfectly round. The hole should be larger than the dowel to allow for the space needed for the glue. Often, the head can have a small crack due to the breakdown of the original glue in a small area. If pried open, inch by inch, with wedges inserted to hold the space open, wood glue can be blown into the area with an air compressor and then the wedges removed. The compression of the structure will suck the joint down tightly, eliminating the need for any further repair in the area.
Often as wood shrinks it will get fissures or cracks along the grain of the wood. A way of getting a bond in this case is a product developed by the miniature wood model industry. It is referred to as the Super Glue for the wood hobbyist. There are two types, Insta Cure which bonds in 1 to 3 seconds and Gap Filling which gives you a whopping 5 to 15 seconds. It is pricey and thin, which means you can apply it to very small hairline cracks. It is cyanoacrilate and is distributed by Bob Smith Industries. It is usually found in hobby stores that specialize in wooden hobbies and crafts. Ferring Epoxy is product developed for the marine industry and is used in areas that are affected by dry rot. It can not be used as a glue. It does however, completely fill and encase the affected wood fibers and creates an epoxy based salvation for carved detail areas that would otherwise be lost.
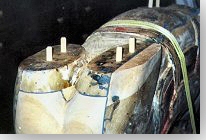
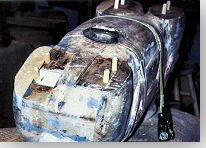
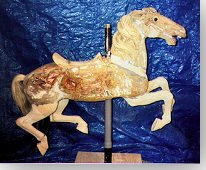
Photo 1 and 2 show the body structure of Rooster, front and back ready for doweling of the hips. The dark lines are areas where PC.7 glue was used. The new wood pieces and old wood can also be seen. Photos 3 and 4 show the figure ready for final sanding and priming. Rooster has received a combination of lamination, dowel joints, epoxy glue and treatments for dry rot. As you can see, the areas that will receive the most wear and tear and were in the poorest condition had to be re-carved and replaced. At this point, we should call him Humpty Dumpty. And he has been put together again! Please remember, there are other comparable glues and brands that can be used other than those mentioned here! In the next article we will paint "Rooster". Photos on this page are provided courtesy of Bob Cherot, Montana Carousel Company, Inc.
Click here to display our site map
|
|||||||||||||||