Part One of a Three Part Series by Bette Largent
This past summer I had a scheduled series of weekend workshops
for a community of carousel enthusiasts that were carving a new carousel. The
Washington Antique Carousel Society, based in the Tacoma area, has been
gluing, blocking, and chipping away at a growing creation of Parker style
horses and menagerie animals that depict the Northwest Coast area.
With many new carvers who have spent countless hours learning their craft
and creating a perfect carousel animal, the thought of putting on that first
brush full of paint can be intimidating. We decided to overcome these "first
horse" jitters by doing their workshops entirely on plastic cast horses. They
could learn the technique and if they didn't like what they had done, they
could simply paint on a new coat of primer and start over. No artist ever
painted a masterpiece on the first try. Why expect a masterpiece on the first
paint job on a carousel animal? Practice, practice, practice was the key
phrase.
While the group gathered over a dozen of the various styles of plastic
horses often used on jumping spring mechanism for children, I went on my
search for an appropriate animal to "practice" on. My finished carousel horse
would be for my daughter, Lissa, who had waited over 10 years for a carousel
horse for her bedroom. There had been many carousels and private commissions
done prior to this piece, but painting a plastic horse was a new experience
for me. She would have the final say on color and style, just like any other
commission piece.
I wanted a horse I could "save" just as we save the antique animals in a
restoration. We began to search flea markets, swap meets, and garage sales. I
unleashed my scouts - friends who also go to such things - with a description
and price of what I wanted. My friend Olga showed up with the most decrepit,
moldy looking plastic horse I had ever seen. Perfect! It's tail was split,
it's ears were gone, it's legs were cracked open, and it even had mold on it
amongst the dirt and grime. Someone had tried to fill it with expanded foam
which had ballooned it out into light bulb shape.
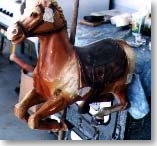
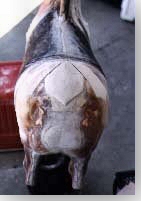
Filling the handle and foot rest holes
|
We laughed and Lissa moaned something about not putting that thing in her room!
Even a conversion to a mailbox was suggested. When I began the job of saving the
little wonder baby, the first thing to do was to scrub it down with bleach and
soapy water to remove all the grime. A scrub brush came in handy to get all
the built-up dirt out the grooves. The next step was to cut off the split tail
which "popped" right out of the back.
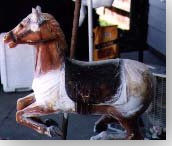
I then cut off the wooden dowels used as handle-bars and foot rests that
held the original springs. These were cut flush with the body and I forced
wood glue in the holes around them and applied masking tape to curb the drips.
I drilled a hole through the body to hold an old mop pole, which I glued in
place and placed it in a temporary stand. (A Christmas tree stand will work to
hold the horse upright or upside down as you work on it) I began to fill in
the holes where the dowels were to blend the shape to the rest of the body.
This would take several applications of Liquitex acrylic modeling paste (hard).
I shaped and sanded the final layers of the dry paste to blend them.
This would take several applications of Liquitex acrylic modeling paste
|
Now
for those missing ears. The broken area was jagged and uneven. I leveled off
the area by cutting it flush with the head with a saw. I then attached a block
of bass wood cut to the approximate size of the ears I wanted. I used a dowel
inserted in the block and glued the block to the head just as I would to
replace an area on a wooden horse. After this was dry and tested for tightness
I began to shape the ears with my Dremel and carving tools. This is where my
respect for carvers is multiplied a hundred-fold. To carve one ear was no
problem, to carve two ears that matched was another story. I ended up with
ears that were too small but were expressive and I had a time element. I had
to go on.
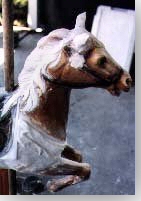
To carve one ear was no problem, to carve two ears that matched was another story
|
The
little pony was plain. A Western tooled saddle, bridle, and a blanket embossed
with the ABC's and the words Wonder Horse were all the embellishments. In
working with the other parts I had discovered that the plastic material was
approximately 1/4 inch thick. I could carve a little more detail in the mane
area. There were molding seams that ran through the middle of the body, the
head, legs and chest. The mane was identical on both sides and the forelock
was chopped and boring. The plastic had oxidized and was pitted or nicked in
many areas. I began to sand down the seams and fill the cracks just like a
real restoration. The customer, Lissa, didn't want the alphabet on the blanket
so I also filled it with the acrylic modeling paste, shaping a blanket with
slight folds in the corners. I also applied more hair tendrils to the mane on
the romance side and the forelock area.
The middle lapel was added by soaking layers of newsprint with glue
|
As I
wanted to add more decorations to show various paint techniques I created a
drape of fabric across the chest. This was merely a piece of cotton fabric
soaked in glue. As I attached it to the chest, I created folds and contours.
Once dry, I slit small openings in the folds and squeezed more thinned
modeling paste into the air pockets to make it more solid. After this dried I
coated the outside with several more coats of the thinned modeling paste with
a brush.
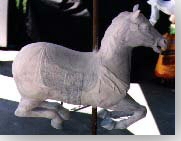
The horse was sanded with 200 grit sand-paper and primed
|
I
also experimented on the area behind the saddle. The middle lapel was added by
soaking layers of newsprint with glue and applying it to build up the area.
The side lapels were done by just brushing on layers of the modeling paste. I
cut in an edge for pinstriping by using an Exacto knife. The horse was then
sanded with 200 grit sand-paper and primed with BIN primer by Zinsser. I
stippled the primer on which would eliminate the need to sand out the brush
strokes. Kilz spray primer can also be used. DO NOT USE GESSO. I then
stippled on a coat of rust-red primer to set the "mood" of the composition and
to build up the depth of color.
I will continue the progress on the wonder baby in my next columns. To
order a new plastic cast horse, ready for painting contact either:
If you have any questions on restoring aluminum carousel animals or on
other painting projects, email me by clicking
Here.
|
Bette Largent is a professional carousel horse restoration artist from
Washington State, and the author of
Paint The Ponies,
a guide for those who are interested in learning the art of painting
carousel figures.
Click
Here
for information on ordering her book.
|
|